VMM Networking
Last update: 02-10-2006
contact
- VMM Networking Introduction
- VMM Networking Syntax
- Networking Example
- VMM Networking Configuration
- VMM Networking server and client script
VMM Networking Introduction
VMM networking features can be used to communicate over a TCP/IP network with MIDI messages. Best performance should be over a 100 MBit/s LAN network, but it even works over the internet. VMM has to be installed on both machines, else it will never work. So before you begin make sure you have tested the configuration on all computers to avoid problems. The most pros of using this feature is that the hardware of the server pc will be used to produce sound, so it saves system resources on the client.
Important: VMM Networking can also be used on one computer, with the server running on localhost (127.0.0.1). Just open another instance of vmmrt.exe to have a client.
VMM Networking Syntax
To call a function externally use "extern".
extern MyFuntion(<value>, [valueN]){
  ...
}
// The argument values are optional, depending on the servers'
// procedure "MyFunction".
To connect to another computer:
 UsePort(<IP ADDRESS>);
 // IP ADDRESS must be seperated by comma's. eg.: 127,0,0,1
To define the port that will be connected to:
UsePort(<value>);
// eg.: UsePort(19780); If the RPC port in the server settings is 19780.
// <value> between 1024-65535.
Networking Example
An example of (useful) usage, imagine this situation:
You are working at a help desk, listening and hopefully solving other people's problems. Unfortunately you are away from home a whole day, and you want to record a radio broadcast to hard disk. It's not possible at your work: the radio station is local and doesn't have the needed range. So what you could do is setup VMM at your home to listen for connections and route it to your favorite audio program, to start the recording.. from any place in the world.
VMM Networking Configuration
SERVER
You have to configure 3 applications.
- VMM: to translate the TCP/IP input to MIDI.
- ROUTER: to send MIDI from VMM to your AUDIO APPLICATION.
- AUDIO APPLICATION: to do something with the incoming data. e.g.: start recording of audio information. This can be done by binding e.g. an incoming NoteOn with a pitch of 60 to the Record button in the application. Most sequencers and recording software allow this.
ROUTER
Let's start with the ROUTER, because: if this program opens all MIDI ports,
all other applications on your computer can connect to and trough it.
If you open the router at the end, some MIDI ports can be allready used by other software,
and the router couldn't access those ports.
internet..--- VMM[m-outX] -------- [m-inX]ROUTER[m-outX] -------- [m-inX]AUDIO APP
NOTE: Keep in mind that routing MIDI can cause problems. To avoid MIDI feedback, it might be better to configure your router this way:
internet..--- VMM[m-outX] -------- [m-inX]ROUTER[m-outY] -------- [m-inY]AUDIO APP
Now the MIDI output of the router can't go back to VMM (if input X was selected there.)
In MIDI-OX I set it up this way:
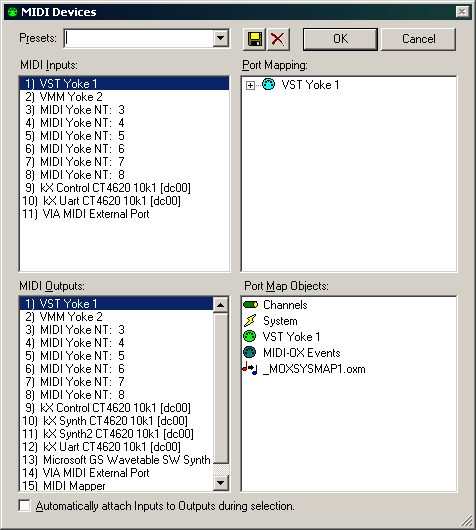 I have renamed the MIDI-OX ports.
That doesn't matter. You can choose whatever you like, as long as you keep this setup in mind for usage in the other software: VMM and the Audio Application.
In this example, all incoming data on the input "MIDI Yoke-NT: 1",
will be routed to the "MIDI Yoke-NT: 1" output.
Audio Application
This can be any application with MIDI support. But to stay with our example, Sonic Foundry SoundForge® 6.0 is used.
You can read more in the SoundForge® 6.0 Manual (.pdf, page 197) on the
SonicFoundry website. There's a demo version available for download too.
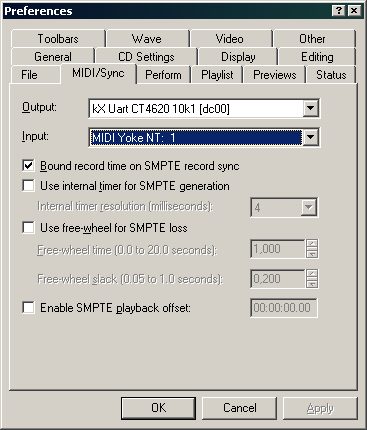
Go to Options - Preferences - MIDI/Sync. Select a MIDI input according the output of the router.
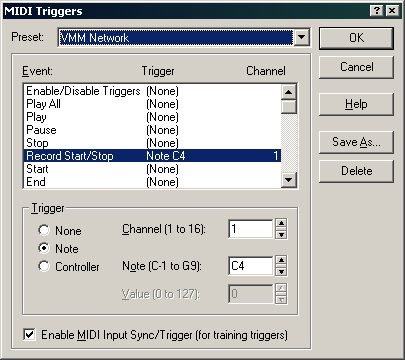
Configure the MIDI trigger.
This is done in Options - MIDI Triggers.
By default in SoundForge®, C4 is the middle C (not C3), thus C4 has decimal value 60.
Don't forget to enable "Enable MIDI Input Sync/Trigger".
VMM Server Settings
After you think the setup is right for your needs, you can run a VMM program on the server.
This will make the functions you have put in the script, available for the remote client after he has connected.
proc MyFunction(parameter1, parametern,...){
     do something.....
     return(result);
}


proc Main(){
       // To keep the program alive.
       loop{
              sleep(1000);
       }
}
- Compile the script.
- Go to Options - Settings and activate 'Act as Server'. Enter a number in the RPC port field (1024-65535).
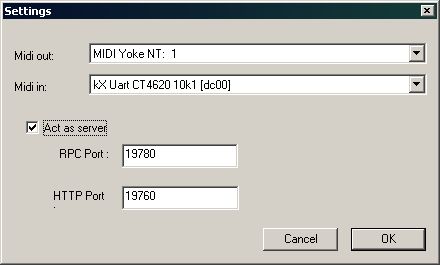
- Run the executable.
With default settings, you can verify your ports by using the netstat command from an MSDOS prompt.
C:\>netstat -an

Active Connections

  Proto  Local Address          Foreign Address        State
  TCP    0.0.0.0:19760          0.0.0.0:0              LISTENING
  TCP    0.0.0.0:19780          0.0.0.0:0              LISTENING
You see much more, but those portnumbers (19760 and 19780) are VMM's.
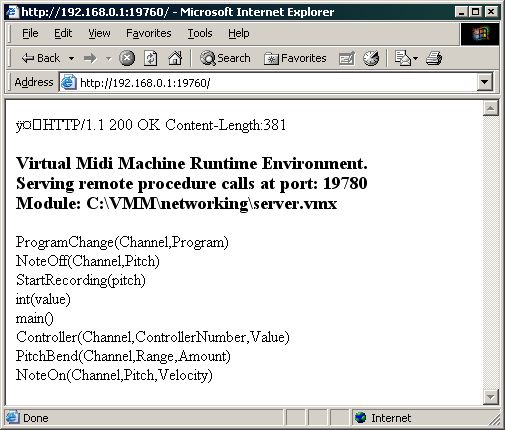
Now you can browse to your created HTTP server and see the available functions.
Going to http://192.168.0.1:19760/ will output:
Firewall issues
This section is still under construction.
CLIENT computer
VMM Client Settings
Create a vmm program by using the "extern" function.
extern Myfunction(parameter1, parametern,...){
  /* extern, tells the compiler the procedure "MyFunction"
  has to be executed externally. */
}

proc main(){

  test;    // a variable to save a result.

  ConnectTo(192,168,0,1);
  /*
  IP address of the server, were the procedure will be executed on.
  Note the comma's between the different network classes. Don't use dots.
  */

  UsePort(18000);
  /*
  The port that will be used for the connection on the remote address.
  That is, the number you entered in Options - Settings at the SERVER.
  */

  test = MyFunction(60);
  /*
  The runtime will try to connect to the server 192.168.0.1 at port
  18000. If no errors occur, the procedure "MyFunction(60)" will be
  executed on the server. The result is sent back to the client, and put
  in the variable test.
  */
}
VMM Networking server and client script
////////////////////////////////////////////////////////
// SERVER.vmm
////////////////////////////////////////////////////////
// script to run on the server.
////////////////////////////////////////////////////////

#include "stdmidi.vmm"

proc StartRecording(pitch){
 NoteOn(1,pitch,127);
 debug(pitch);
}

proc main()
{
 loop{
  sleep(1000);
 }
}
Verify that the MIDI port routing is correct, and NoteOn(MIDI channel 1, note/pitch 60, 127)
is bound to a 'record' button in your audio application.
Compile SERVER.VMM and run the executable.
Before moving to the client computer, make sure you remember or write down the servers' IP address.
////////////////////////////////////////////////////////
// CLIENT.vmm
////////////////////////////////////////////////////////
// script to run on the client.
// pitch: note/pitch value that you have bound to your
//        application.
// 192,168,0,1: IP address of the server.
////////////////////////////////////////////////////////

extern StartRecording(pitch){

}

proc main()
{
 pitch;
 pitch = 60;
 ConnectTo(192,168,0,1);
 UsePort(19780);
 StartRecording(pitch);
}
// The same as the server and client script
// above, but shorter.

// server.vmm
#include "stdmidi.vmm"

proc main()
{
 loop{
  sleep(1000);
 }
}

// client.vmm
extern NoteOn(channel,Pitch,Velocity){}
proc main()
{
 ConnectTo(192,168,0,1);
 UsePort(19780);
 NoteOn(1,60,127);
}
That's it. If you Play the script on the client, recording on the server should start.
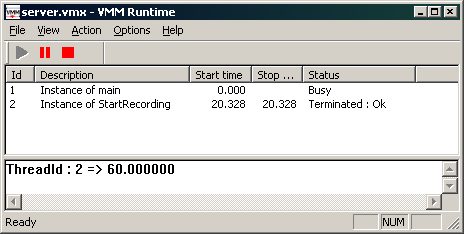 This image is what you see on the server, after playing the client script. The data is verified and debugged.
ThreadID2 => 60.000000 tells us VMM Networking works as it should :-)
HTH,
VMM Team